Saturday, July 25, 2015

Color Coats - Why I didn't use them on this project.

Traditionally, Primer and/or Primer-Surfacer coats are followed by a color coat.  However, when I experimented with a topcoat of white from one of the leading hobby lines, I was less than impressed with the results. The color coat, a solvent based lacquer (Remember, I am using lacquers for their durability and resistance to dirt and stains, this will be a flying rocket), did not cover well, and it looked more like a wash than a color coat. Since, just as with the real Saturn V, each coat of finish added extra weight to the rocket, and the amount of color coat I would need to use to cover the rocket would be time consuming, not to mention, more expensive, I used very fine grained Primer-Surfacers, white, and black, because as lacquers they would lay flat, and the very fine grades (1000 for white, 1500 for the black areas),  made it possible to use ever finer grits of sanding medium (up to 3000 grit), which gave me the smoothest surface, which looked like a color coat, without wasting money and time on a color coat that didn't quite cover well.

Example: This is the Industry standard color coat over the Mr. Surfacer 1200, which sprayed a nice gray undercoat. (Industry Standard meaning the most popular line of hobby colors.)

This is the coverage that resulted.


Although the picture dosen't show it as well, there was considerable issues with the color looking more like a wash, than a true paint job. it also had quite a bit of shine, even though it was a Matte/Flat color.

I only masked off the rocket pods, and it took 4 mist coats to even get this poor level of coverage, while the surfacer covered in just two mist coats.


That is a big concern, since, as you can see,  there was very little coverage, considering that I used a whole 100ml can of a not inexpensive color coat for just that small area. I could sand and finish the fine grained white and black surfacers, they would look and feel the smoothness from 2500-4000 grit sanding sponges, while retaining that flat look.  The smoothness of the surfacer would also provide a great finish for laying decals without the need for a gloss coat to give better adhesion. When you know the proper way to finish a Lacquer, whether it be a primer, primer-surfacer, or color coat, those extra ounces of color coat were, to me, a waste of both time and money. That's why I just used the Mr. Hobby Primers and Primer-Surfacers, which, in the end, gave a more realistic, almost utilitarian finish, which, to me, best reflected the reason for a finish on the rocket in the first place, the white, to cover the aluminum skin to prevent corrosion, and the black areas, which were there to give reference marks so that any rolling of the rocket could be confirmed.

The primer and primer-surfacer gave me the best finish to work, and spared me the expense and time that I would have had to do after the color coats were laid down. Why repeat the work twice, when those coats worked and looked like an actual color coat finish.

You be the judge...

That, to me, most reflected the finish as both utilitarian and aesthetic.

What do you think?


Thursday, July 23, 2015

A note about Sanding

 Above: These are the Mr. Hobby products I used for the primer and finish coats.

Thanks to Red Frog Hobbies! The best selection, service and shipping!

Sanding. The one word that can strike terror through the heart of many a modeler. Have no fear! We at the Vehicle Assembly Building know what you're feeling, so let the Finish Expert give you a few pointers...

"Hey, Finish Expert, why cant I just go to the hardware store and grab any can of paint that looks good and isn't too expensive?"

FE:  Nobody's stopping you Dumbass (thx to Red Foreman) you can put any old can of spray you want on your model.. But if you want it to look good and stay shiny forever, you have to know how to Sand and Polish.

DA: "Sand and Polish?", "What kind of sick joke is that?"

FE:  "Calm down Dumbass, Thats Polish, as in shoes..."

DA: "O.K., I get it, but I don't..."

FE: It's all about making things smoother... here, lemme show you. If you were painting a house, you would probably start out with a low grit sandpaper like an 80 grit perhaps. The higher the number on the paper, or 'Sanding Medium', the smoother it will make your finish, because smoothness will make a good finish look even better, but it will never be a remedy for poor product choice.

DA: "Product Choice...?

FE: Yep. When you know what finish type you are going to use, you then use one brand to ensure consistency of product. That means No Buying Paint Thinner at The Corner Hardware Store! I cant stress this enough. What you put on your model is the most important decision you can make.

DA: Well, that all sounds good Mr. Moneybags...

FE: Hang on there, it isn't about cost, it is about consistency. Sure, you can go out and buy the absolute best model finishes there are, but if you use the wrong, or off brand mixing agent(s), I guarantee you that finish will run for it's life, or eat right into your painstakingly constructed masterpiece. I use good, working finishes from Mr. Hobby (Shameless Plug),  which, after finding a dealer in the U.S. ( Thank you Red Frog Hobbies! (Shameless Plug #2), turned out to be a remarkable finish, with a consistency that works across all of their products lines at a very competitive price, even w/ shipping costs factored in.

DA: I thought we were talking about sanding, and your talking about primers and paint...

FE: Exactly. See, if you choose the wrong finish, you may not even be able to sand it, much less polish it to its intended lustre...  But with the right finish for your purpose, sanding can be easy, even... Fun.

DA: Fun!? Yeah, like sanding is ever... fun.

FE: Sanding..., well, that's never fun, but Finishing; that IS fun.

DA: Finishing?

FE: The difference between sanding and finishing, between an ok paint job and an exceptional paint  job, without ever spraying one mist coat too many.


FE: I used a fine 'grit' Lacquer Primer/surfacer, which was sanded with 1000, 1500 and 2000 grit combination of paper and sanding sponge, the lacquer is able to stand up to wet sanding without harming the underlying materials (cardboard tubes).  the same methods will be used for the white and black topcoats, where the ultra fine grits will actually make the surface so smooth, it will shine like a gloss topcoat, and will give a great surface for the decals to set up on, then all will be covered with Mr. Super Clear matte finish to provide a coat over the decals, and prevent any fingermarks from marring the paint, and can be washed with a simple damp sponge.  And that, DA, is how you apply a rock hard finish to your rocket that will look good for a very long time.


The last topcoats of base white are done, I will be starting the masking of the black striping (which was used as a reference to see the roll of the rocket in flight). I am going to use a brush to apply the black, as it lays quite nice, and there still is too much area to use an airbrush effectively. I should have it all done by tomorrow eve, (obviously, humidity, weather, and pure old research kept me from making this deadline) and then it's decals, clearcoat, and then the fine detail painting of the silver areas of the CSM (Command/Service Module).  It will finally start looking like the real thing!

Monday the 20th of July was the anniversary of Apollo 11, so my timeline is a bit off, but having started in March, I thought it was a good time to shoot for, but my vaca was plenty of time to get some good work in.

Thursday, July 16, 2015

Cloudy days are great painting days

A few sprinkles of rain isn't going to stop me today, the air is just right with just a bit of breeze, the colors pop out and details are not washed out by the harsh sunlight.  I can get almost all my base coat painting done today..

Hot Paint Tip for Professionals only

A potentially dangerous but great way to get the most out of your precious $$$ can of Mr. White Surfacer 1000 is to  make a 'Hot Can', which will keep that mix in suspension as that can holds the increased pressure from the extra heat.  It really makes a difference, especially when using these fine Primer-Surfacers which need to lay down smooth without washing out detail. A hot can sprays a finer, more intensely vaporized spray, which lays down smooth as glass, lacquer hard as iron, but not 'Hot' in a chemical sense, that the solvents in the finishes you use literally melt the vacu-formed wraps.

I have found the Mr. Hobby line of products to be exceptional in coverage, consistency, and workability.  The products lay well from airbrush, can, and even brush. With such a large area to cover, I elected for can for consistency and appearance, using airbrush and hand brushing for the finest of details.

Now for the ugly legal stuff:

Don't try this at home. The techniques described here are performed under controlled conditions, by a professional with years of experience in the application of lacquer model finishes.  The combination of heat and pressure can go horribly wrong if your dumbass dosen't do it right. So no crybabies..

Part One

Let's Lay Some Primer

Primer is a must-have for any project of this magnitude. Since the model will be exposed to the elements, and subject to launch and recovery, the finish not only has to look good, it must also be a part of the model itself, acting as another layer of strength and protection to The Saturn V Launch Vehicle. That is why I chose a Lacquer finish, it will not only stand up to the rigors of construction unlike a water-based acrylic, it will also have superior hardness and sandability. I can also use acrylics on the details and any acrylic clear will not attack the Lacquer undercoats.

What you'll need

1. A glass batter bowl, which provides for an even heating of the water, a great heat sink for re-warming the can, and a stable platform that is less prone to tip-over and spillage.

2. An accurate chef's grade pocket thermometer. Again, since we are working with heat and pressure, accuracy is very important, so now your temperature, know your pressure.

3. (2) Tea or hand towels.  Two functions. a) Insulates the glass bowl containing the hot water. (b) Prevents any flying shards if the glass happens to shatter, even the best ones do (legal stuff!:)

4. Can of finish, primer or topcoat; Lacquer

What to do

Place the can of paint into the batter bowl. fill with water to the 1/3 level of the can, or just before the water affects the can's buoyancy. (the can will get LIGHTER as product is sprayed, so not too much water.)

Warm the bowl and water in a low power microwave for 4 minutes. The point here is to use the bowl of water as a heat sink, warming the can and keeping it warm.) The water should be no hotter than 120 deg. F Anything above that temperature risks failure of the can.

Wrap the bowl in the towel, placing that on another towel. Put can in the bowl. The can, will take alot of slow heat, so let it warm right up. It should feel hot to the touch, but will not burn you when held in your bare spraying hand.

You will notice right away that the mist is stronger and adhesion is better. This will be especially apparent with a Lacquer finish. The second and subsequent coats will lay better and 'melt' easier into the previous coats, providing a tougher and more detailed look.

So hey Kiddoes, get out there and 'Hot Can' your next model!

Steve

Editor's Note: There are no towels in the pictures for purposes of clarity. 


Latest Pic

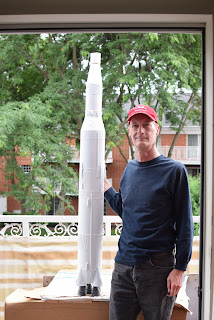
Latest progress.. Note the nice masking job..